
Chad Rutherford
iOS Developer with experience in Swift and Objective-C
Implementing a take home challenge for practice
Attempting a Take Home Challenge
In search of new ways to keep my skills sharp, I recently decided to go in search of an iOS take home challenge I could complete. I stumbled on a take home project from reallabs called the JetFuel Take Home Exercise here: TakeHomeChallenge
So to start out, I started a new Xcode project, setting up my structure and adding the testing framework.
Then after completing the restructure I decided this was going to really stretch my skills by utilizing the nested UICollectionViews inside each other 100% programmatically. To do this I had to go into the info.plist -> Application Scene Manifest -> Scene Configuration -> Application Session Role -> Item 0 and remove the key for Storyboard Name (click on the minus). After that, I went to the general settings for the project and deleted Main from the Main interface section. The only thing left to do to remove a storyboard approach wqas to remove Main.Storyboard from the project.
Next was setting up a programmatic approach in SceneDelegate. Thankfully they already had a decent starting point to which I could add on to. I named the windowScene Apple set up to windowScene instead of _. Next I had to create a window by setting window = UIWindow(windowScene: windowScene). I then set window.rootViewController = ViewController and set window.makeKeyAndVisible(). To prove I set this up correctly, I went into ViewController.swift and inside viewDidLoad(), I set view.backgroundColor = .systemTeal. Build and run....
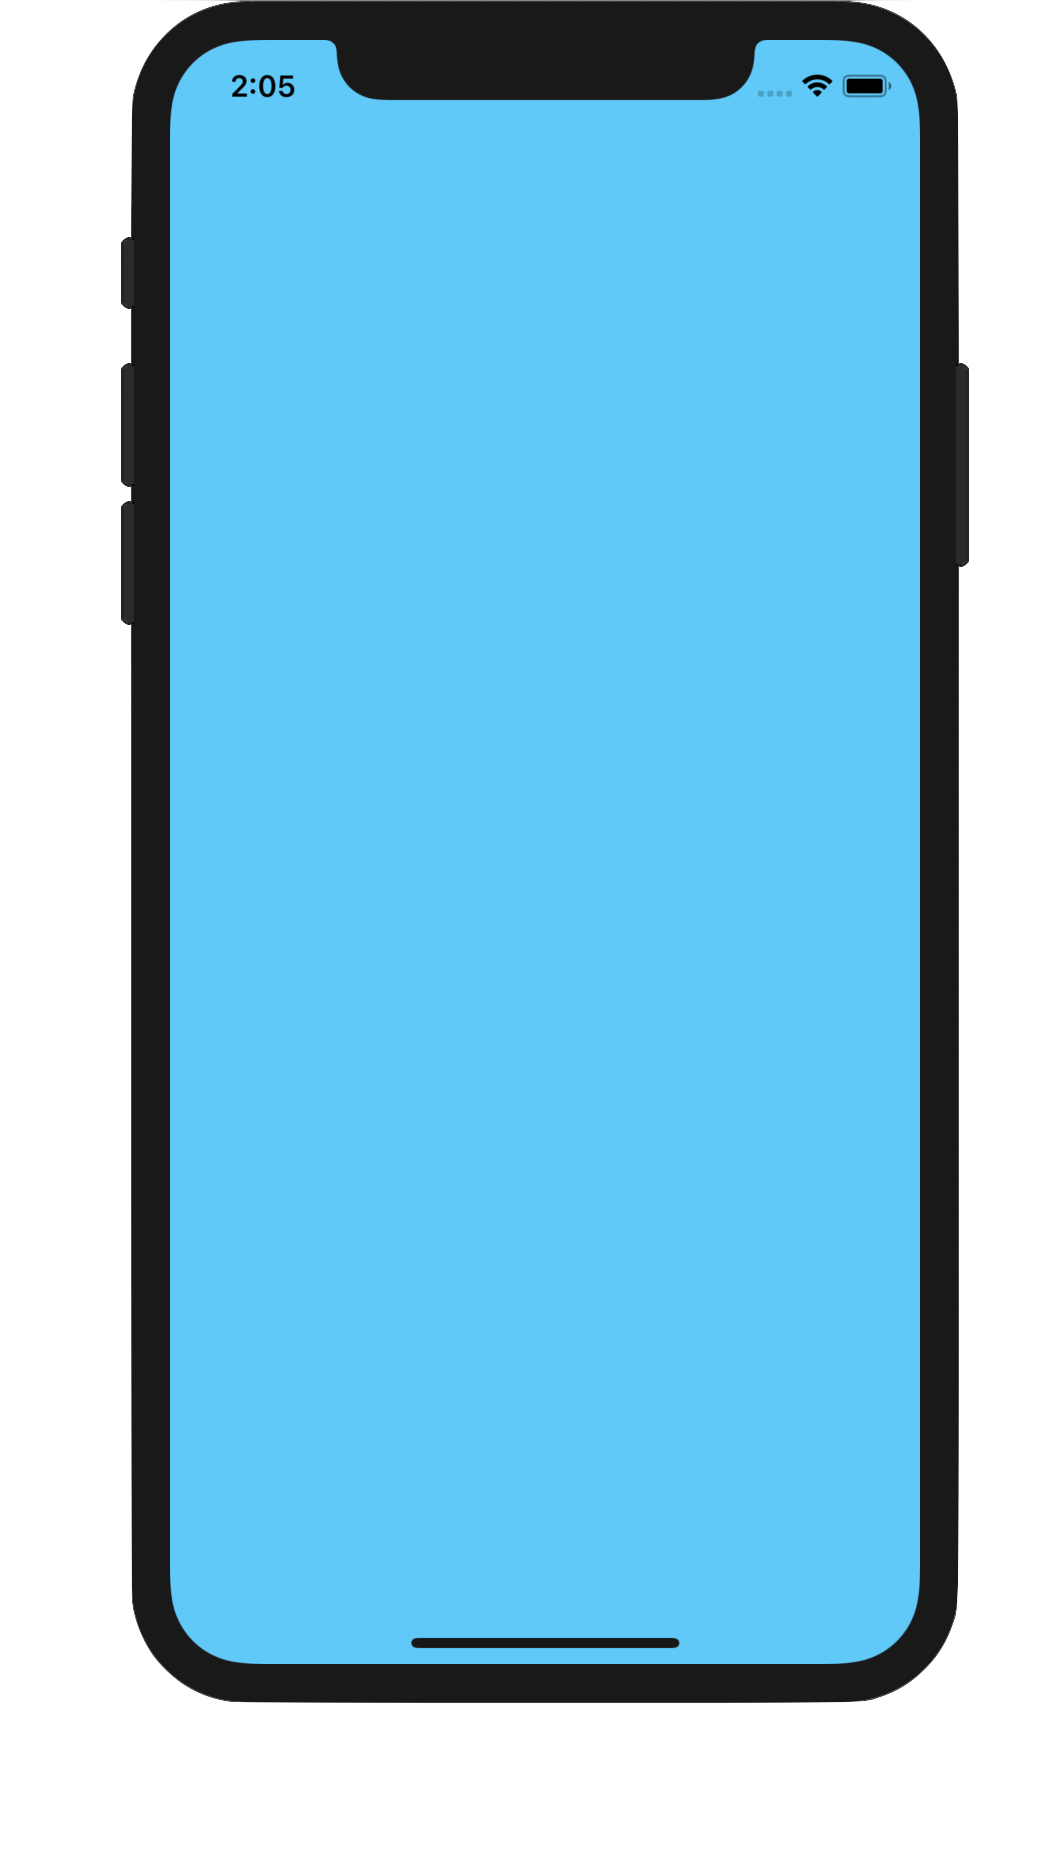
Success!
Now on to making this a collectionview. I went back to SceneDelegate and created a Navigation Controller with the view controller as the root with the following code.
let layout = UICollectionViewFlowLayout()
layout.scrollDirection = .vertical
let feedCollectionViewController = FeedCollectionViewController(collectionViewLayout: layout)
let navController = UINavigationController(rootViewController: feedCollectionViewController)
window?.rootViewController = navController
window?.makeKeyAndVisible()
This gave me a setup UICollectionViewController to work with. Now I needed to make it show something to verify it was working. By setting numberOfItemsInSection to 5 and creating a new CollecitonViewCell subclass and registering it in viewDidLoad, I now had a working CollectionView...
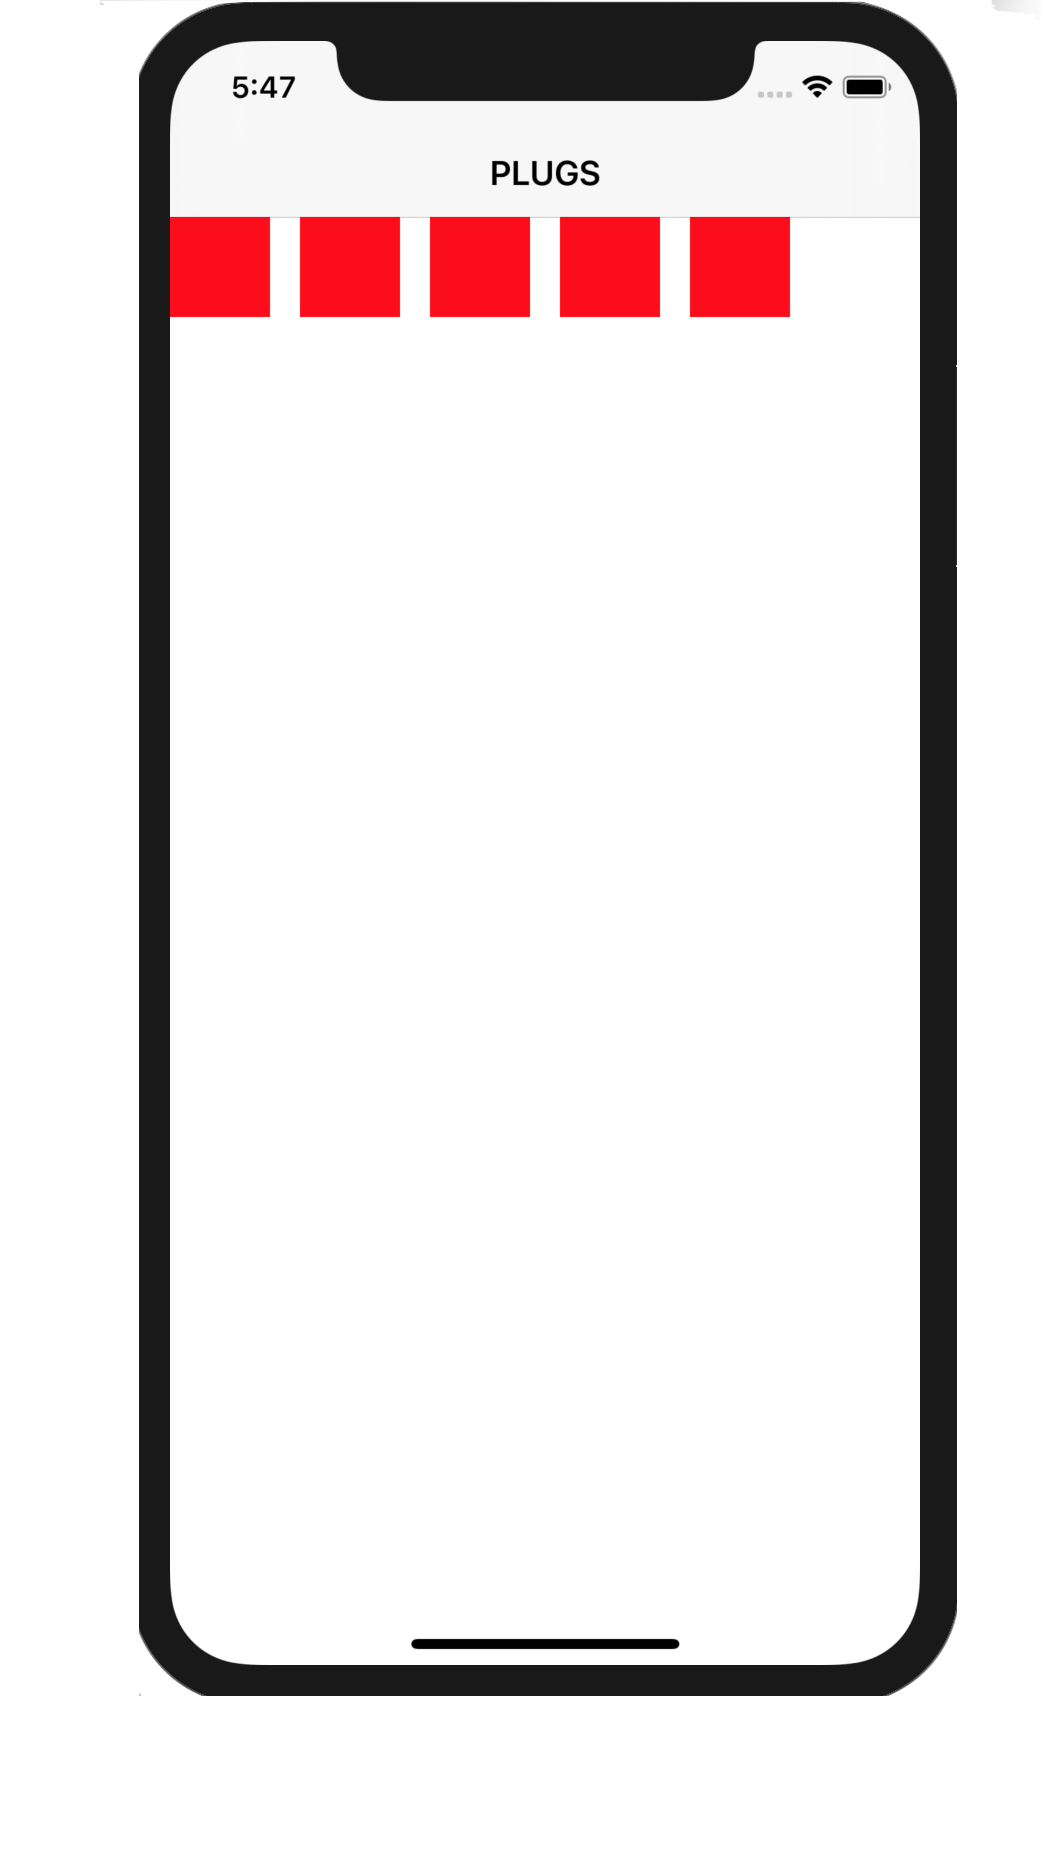
The next step was to make the cells bigger and start adding and constraining items in it to match the design spec. I extended FeedCollectionViewController to conform to UICollectionViewDelegateFlowLayout and set up a CGSize(width: collectionView.frame.width, height: 360) and then added programmatic UI Elements. Starting with a UIImageView, I pinned it to the top of the contentView and constrained it's width and height. then I added 3 labels. One for the campaign name, price per download and a label to say "per install".
This is what my configureUI method looks like:
private func configureUI() {
	contentView.addSubview(iconImageView)
	contentView.addSubview(nameLabel)
	contentView.addSubview(payLabel)
	contentView.addSubview(payPerInstallLabel)
	NSLayoutConstraint.activate([

		iconImageView.topAnchor.constraint(equalTo: contentView.topAnchor, constant: 20),
		iconImageView.leadingAnchor.constraint(equalTo: contentView.leadingAnchor, constant: 20),
		iconImageView.heightAnchor.constraint(equalToConstant: 60),
		iconImageView.widthAnchor.constraint(equalTo: iconImageView.heightAnchor, multiplier: 1),

		nameLabel.topAnchor.constraint(equalTo: iconImageView.topAnchor, constant: 8),
		nameLabel.leadingAnchor.constraint(equalTo: iconImageView.trailingAnchor, constant: 16),
		nameLabel.trailingAnchor.constraint(greaterThanOrEqualTo: contentView.trailingAnchor, constant: -20),
		nameLabel.heightAnchor.constraint(equalToConstant: 20),

		payLabel.topAnchor.constraint(equalTo: nameLabel.bottomAnchor),
		payLabel.leadingAnchor.constraint(equalTo: nameLabel.leadingAnchor),
		payLabel.heightAnchor.constraint(equalToConstant: 25),
		payLabel.trailingAnchor.constraint(equalTo: payPerInstallLabel.leadingAnchor, constant: -4),

		payPerInstallLabel.topAnchor.constraint(equalTo: nameLabel.bottomAnchor),
		payPerInstallLabel.heightAnchor.constraint(equalToConstant: 25)
	])
}
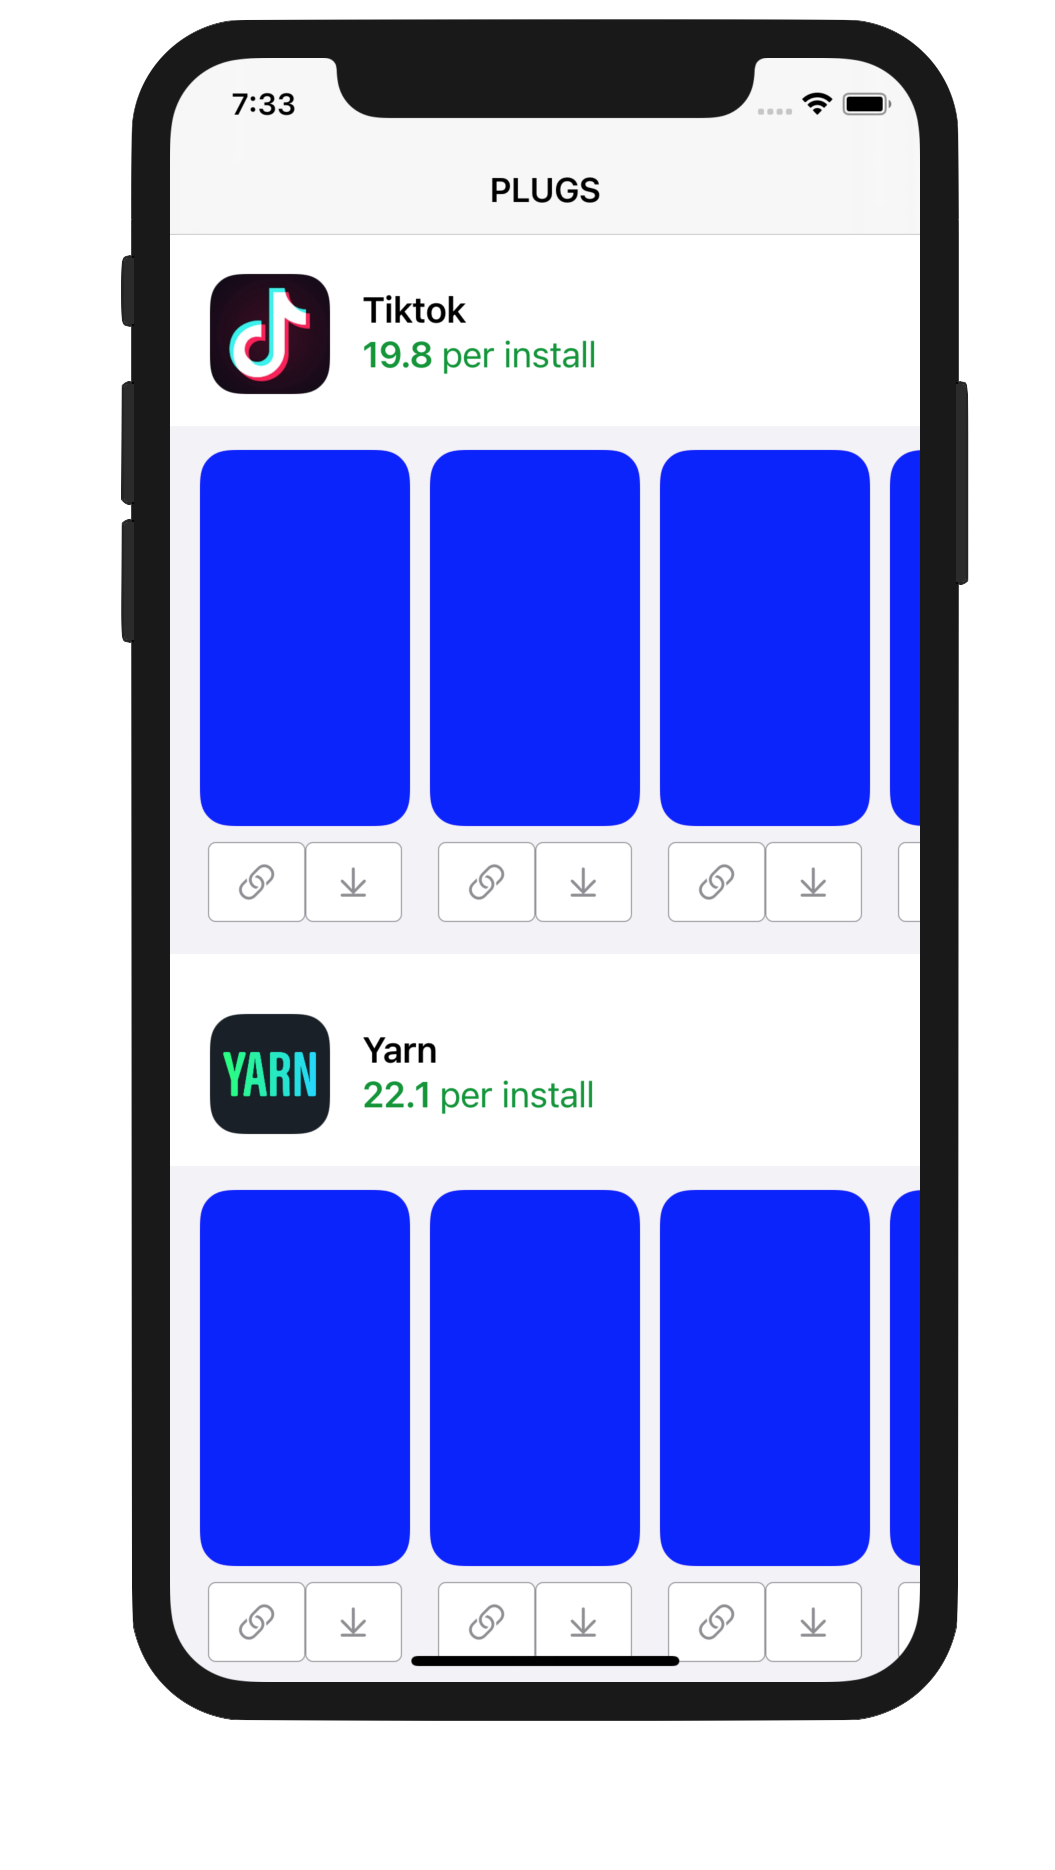
and here are the results:
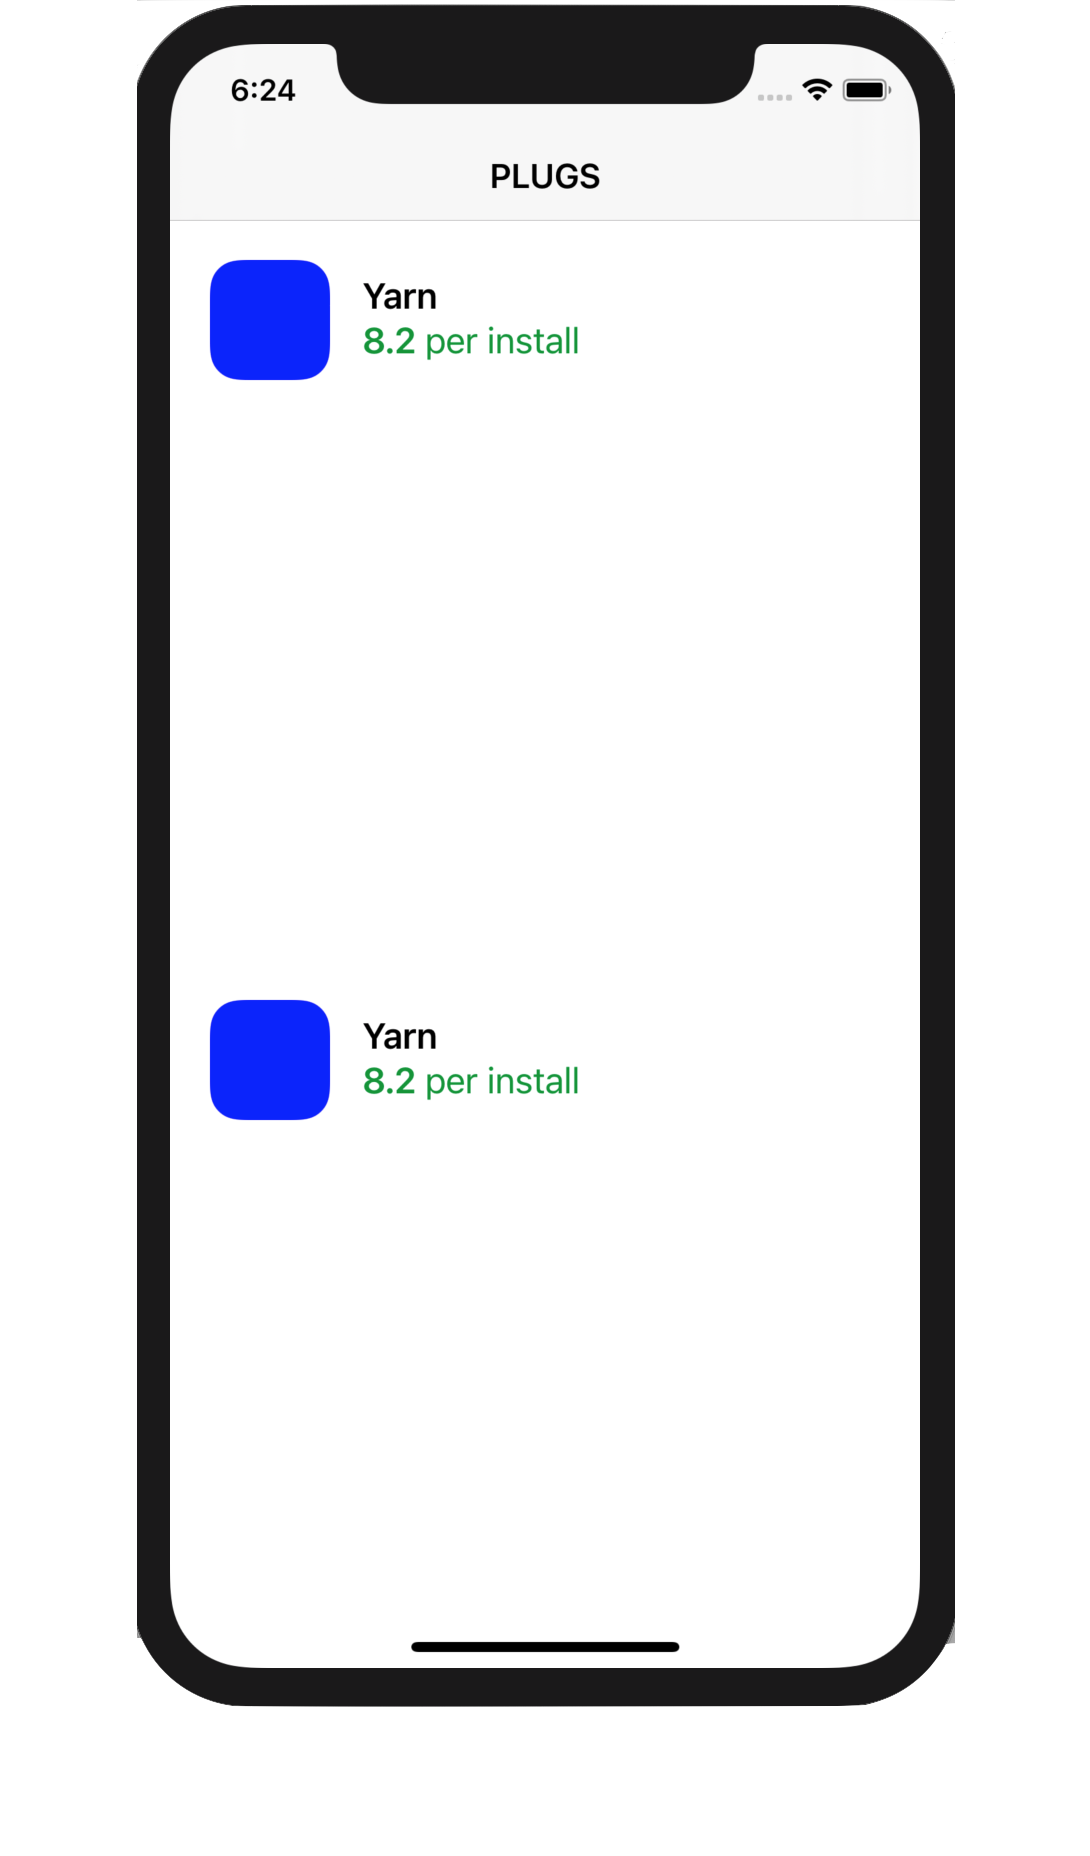
Now that I had a framework to display the data with, it was time to ping the server and popualte the UI Elements with real data. So I worked in the API calls, and routed the objects to their correct places using cellForRowAt. I decided to display it using the old UICollectionViewDataSource methods for now. Will re-implement with UICollectionViewDiffableDataSource later. So the network calls are back and the data has been validated using Unit Tests to make sure the JSON is being parsed correctly using Codable. Now it's time for the green light moment. Build and run and.......
We have icons, names and price per download all populating correctly!
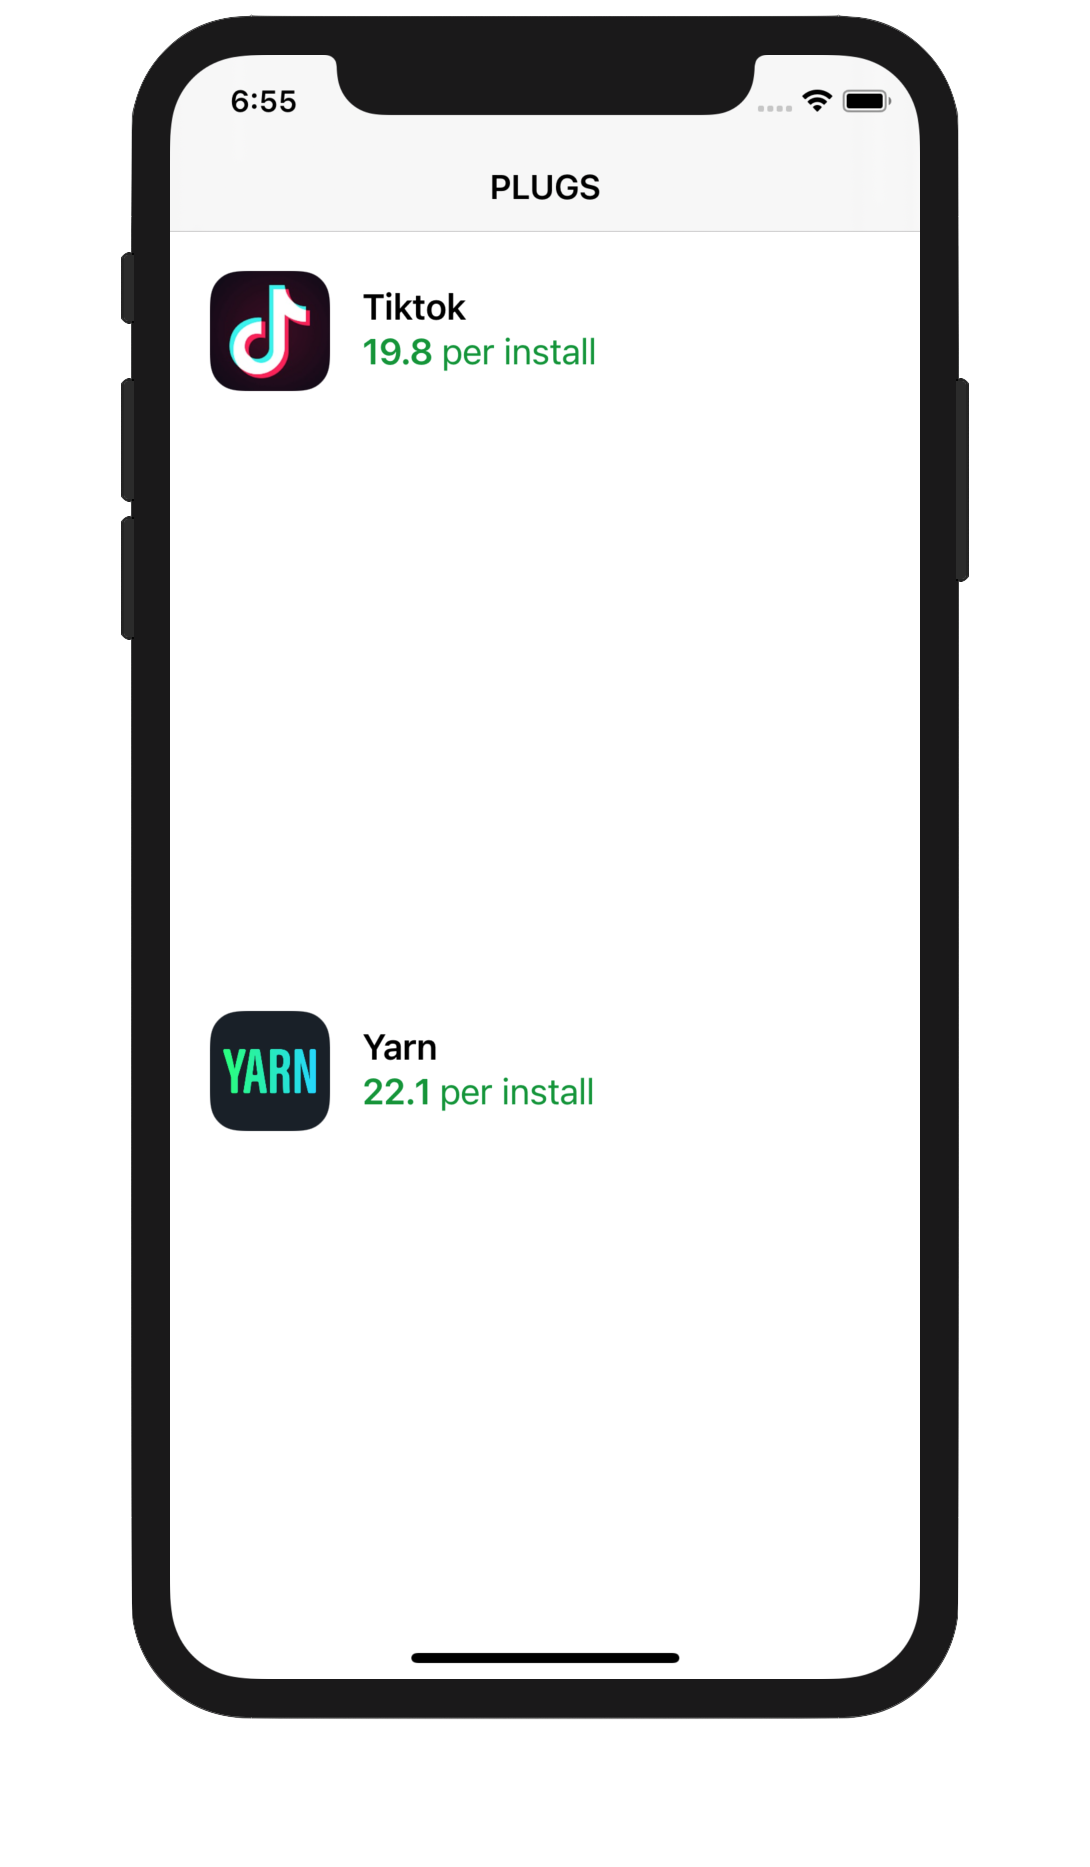
The next task was to populate the inner cells with buttons and images for "previews" of the video files at the URLs. So I againg went about laying out the framework for my UI Elements, using scaffolding and sizes for my dummy views and background colors so I could see the shape and size and get the layout looking good. So I added a collectionView property to each feed cell. and UI Elements to each cell. I needed two buttons and a UIImageView. The buttons would not change based on data so i laid them out the way they would be and used a blue blank image view to place the previews.
The next task was to populate the image views with the preview thumbnails and play buttons for the video files. So off to another network call this time for the download URL attached to every Media object. This task was particularly easy as I already had the networking framework set up, all I had to do was call it. Build and run.....
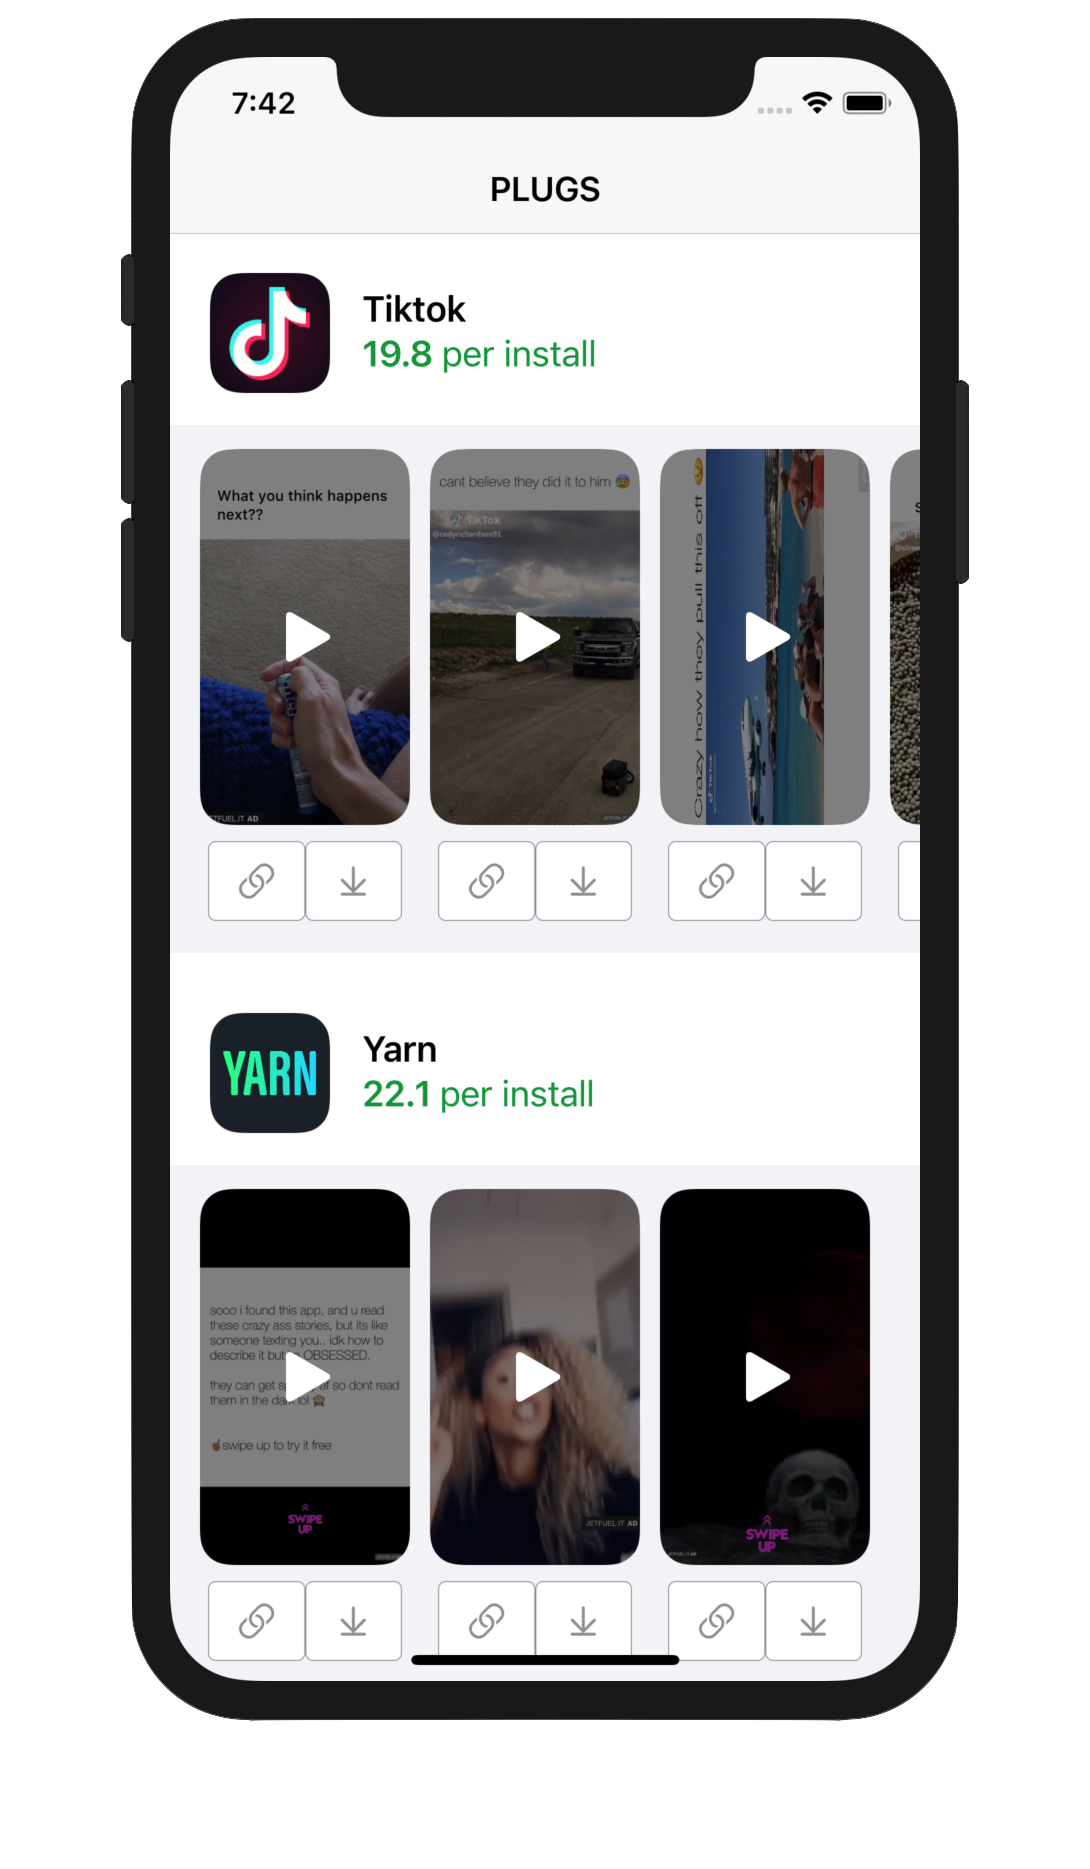
Perfect!
The last items were to add a copy link to clip board function connected to the link button:
linkButton.addTarget(self, action: #selector(copyLink), for: .touchUpInside)
@objc private func copyLink() {
	guard let media = media else { return }
	let pasteboard = UIPasteboard.general
	pasteboard.string = media.trackingLink.absoluteString
}
this allows the user to copy the link for the video in that cell to their clipboard. And the final MVP task was to enable the user to download the video to their device. This is done here:
downloadButton.addTarget(self, action: #selector(downloadMedia), for: .touchUpInside)
@objc private func downloadMedia() {
	guard let media = media else { return }
	DispatchQueue.global(qos: .background).async {
		if let urlData = try? Data(contentsOf: media.downloadURL) {
			let documentsPath = NSSearchPathForDirectoriesInDomains(.documentDirectory, .userDomainMask, true)[0]
			let filePath = URL(fileURLWithPath: "\(documentsPath)/tempFile.mp4")
			DispatchQueue.main.async {
				do {
					try urlData.write(to: filePath)
				} catch {
					print(error)
				}
				PHPhotoLibrary.shared().performChanges {
					PHAssetChangeRequest.creationRequestForAssetFromVideo(atFileURL: filePath)
				} completionHandler: { completed, error in
					if completed {
						print("Video saved!")
					}
				}
			}
		}
	}
}
As a stretch (bonus) goal I wanted to implement functionality to enable the user to play the video file in AVPlayerViewController but I haven't figured out a solution to this yet. This was a fun project and even though I went 7 hours over the 3 hour limit, I learned a lot about CollectionViews and nesting them inside one another.
Til next time, Ciao! Chad